The Real Way to Recover from a Herniated Disc (Not Just Mask the Pain)
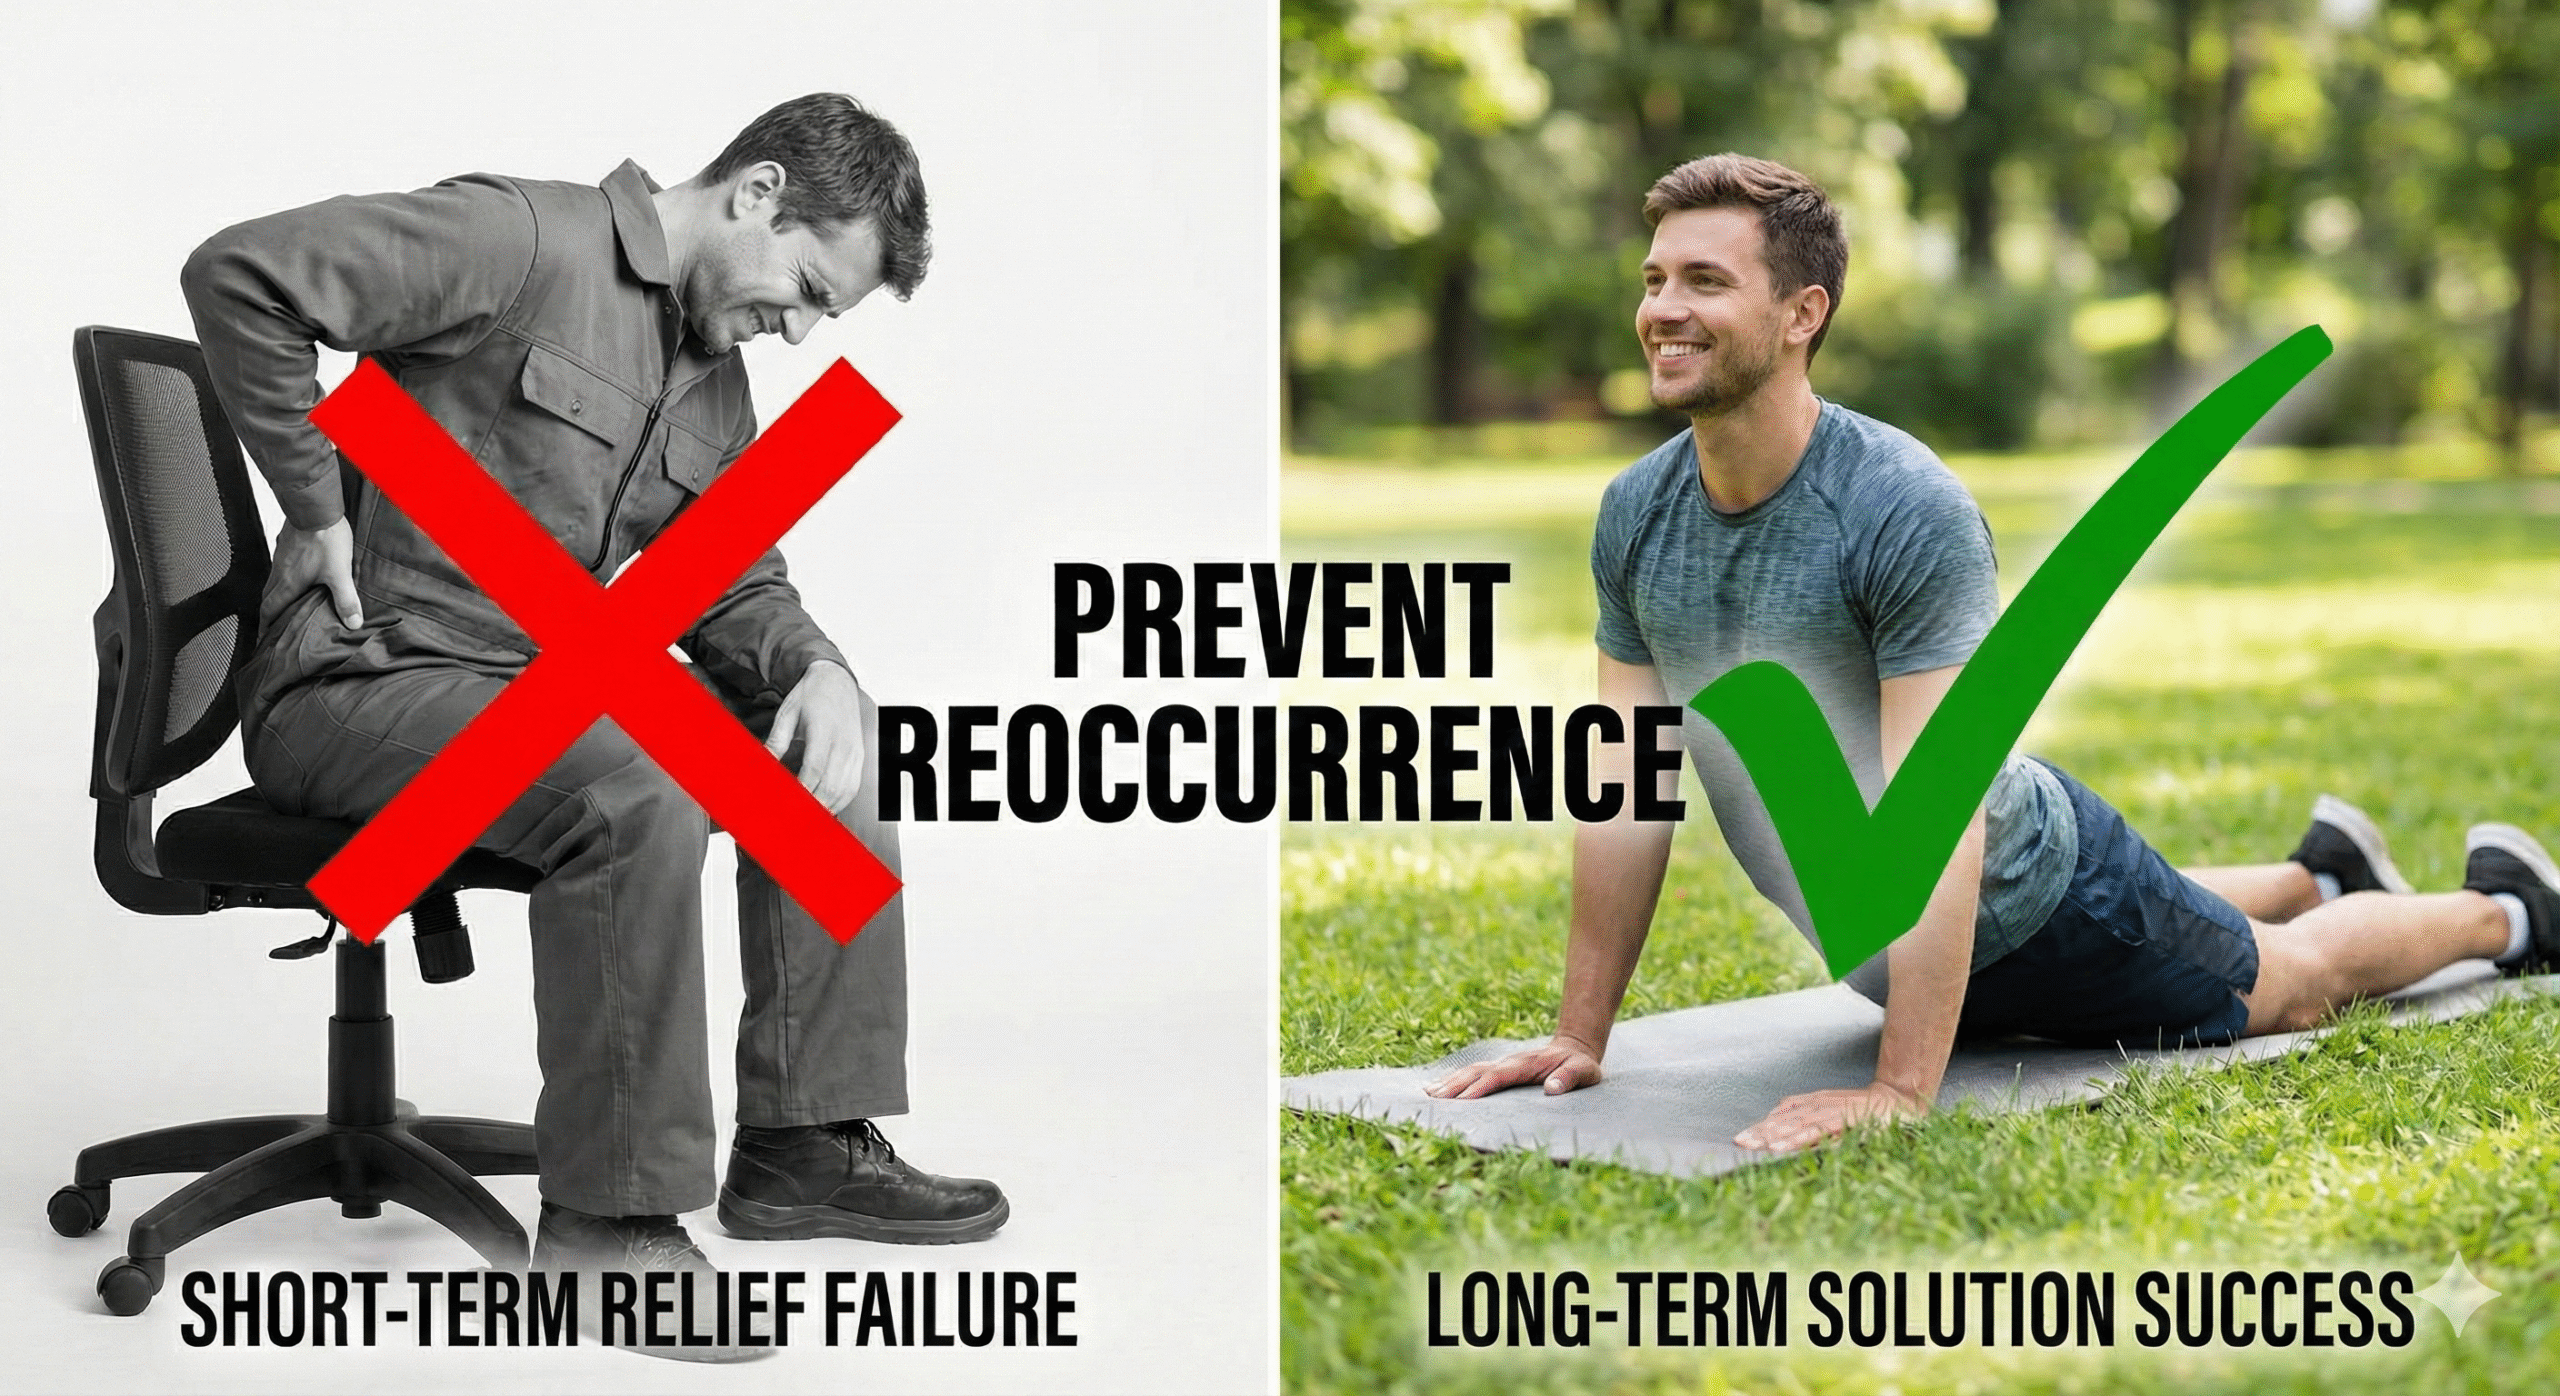
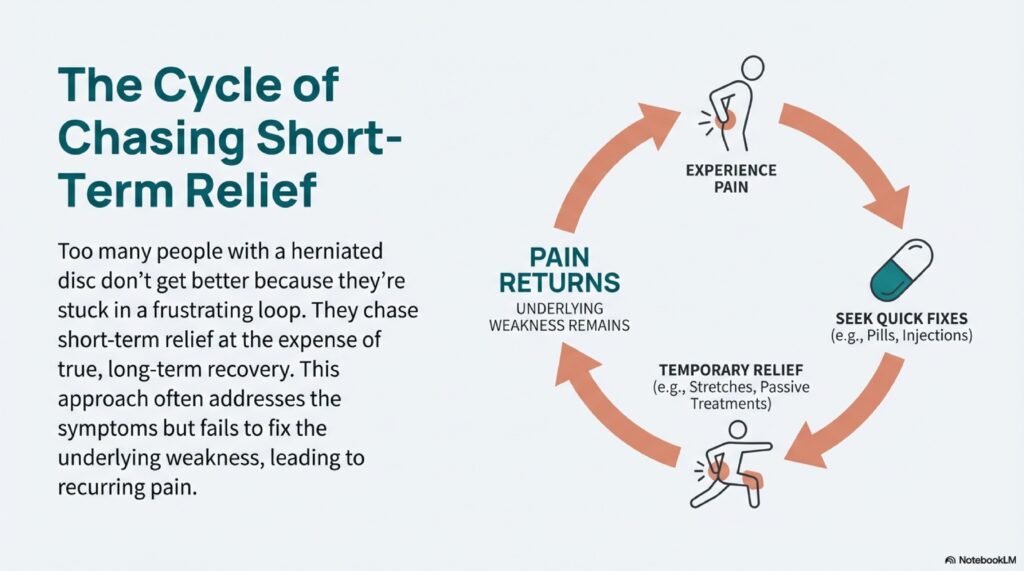
Here’s the brutal truth about herniated discs: most people never actually recover. They just chase temporary relief.
They ice it. They pop pills. They get adjustments. They feel better for a few hours or maybe a couple days. Then boom – they’re right back where they started.
Why? Because they’re treating symptoms instead of fixing the actual problem.
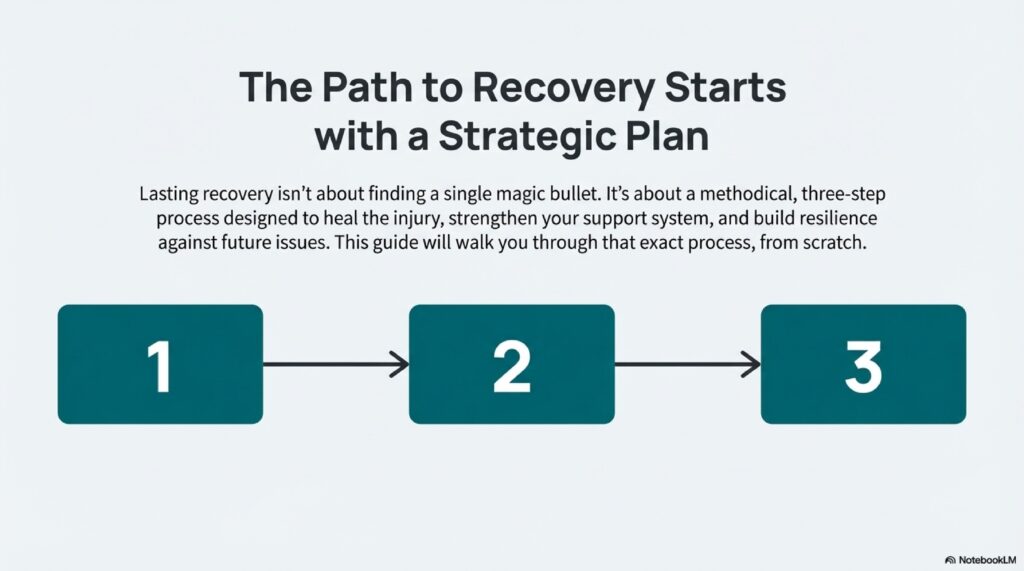
If you want to truly recover from a herniated disc – not just manage it, but actually heal it – you need a completely different approach. One that addresses the root cause and builds your back stronger than it was before.
Let me walk you through the exact three-step process that actually works.
The Problem with “Quick Fix” Treatments
Before we dive into the solution, you need to understand why most treatments fail.
When your disc herniates, that gel-like center pushes out through a tear in the outer layer. It presses on nearby nerves, causing pain, numbness, or tingling. Makes sense so far, right?
So what do most people do? They focus entirely on reducing that nerve pressure to kill the pain. Ice packs, pain meds, massage, stretching – all aimed at short-term relief.
But here’s what nobody tells you: relieving the pressure temporarily doesn’t fix the herniation. The disc is still damaged. The surrounding muscles are still weak. Your spine is still unstable.
That’s why the pain keeps coming back. You’re putting a band-aid on a structural problem.
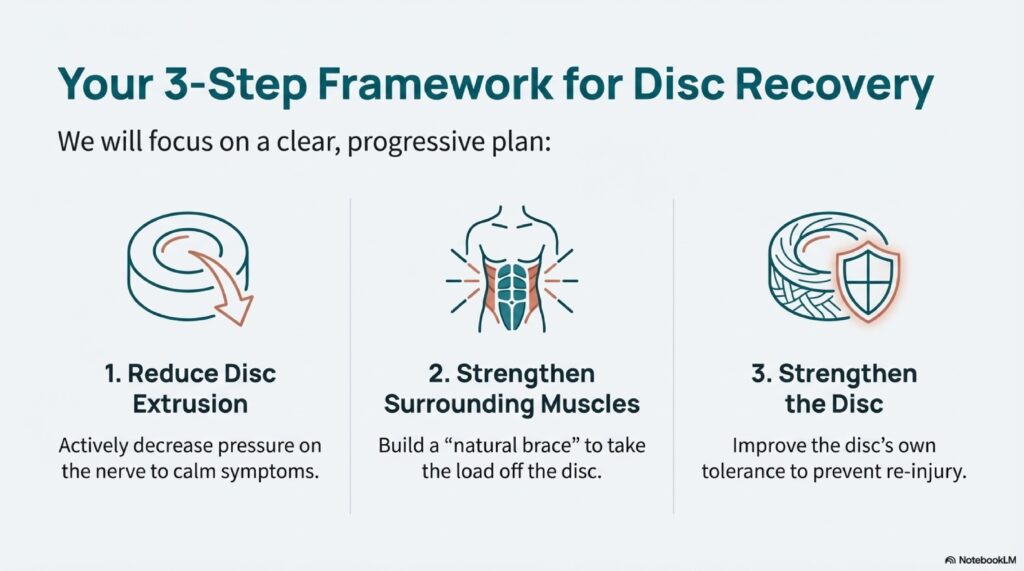
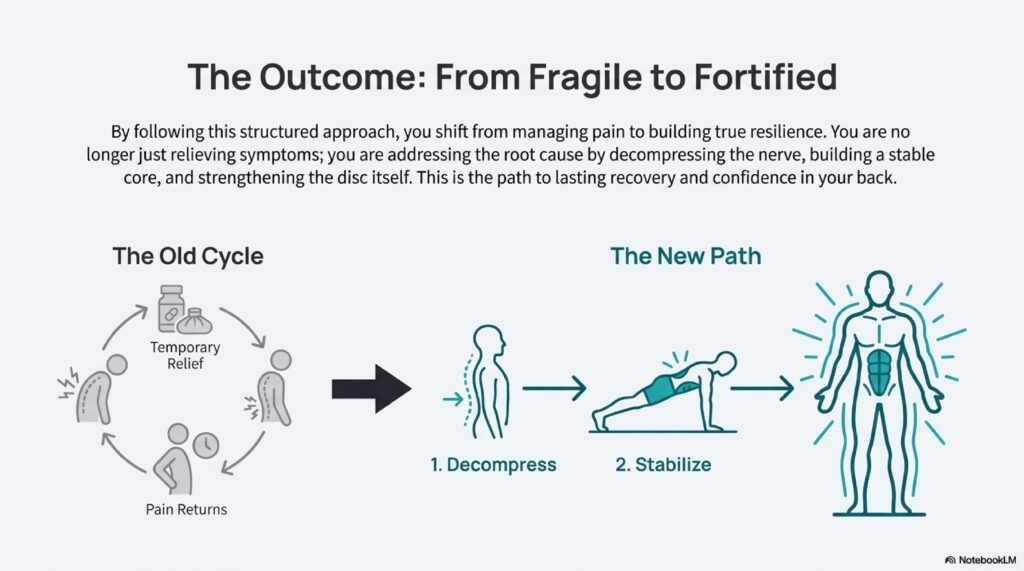
Real recovery means three things:
- Reducing the disc extrusion (pushing that bulge back in)
- Strengthening the muscles around your spine
- Making your disc itself more resilient
Let’s break down exactly how to do each one.
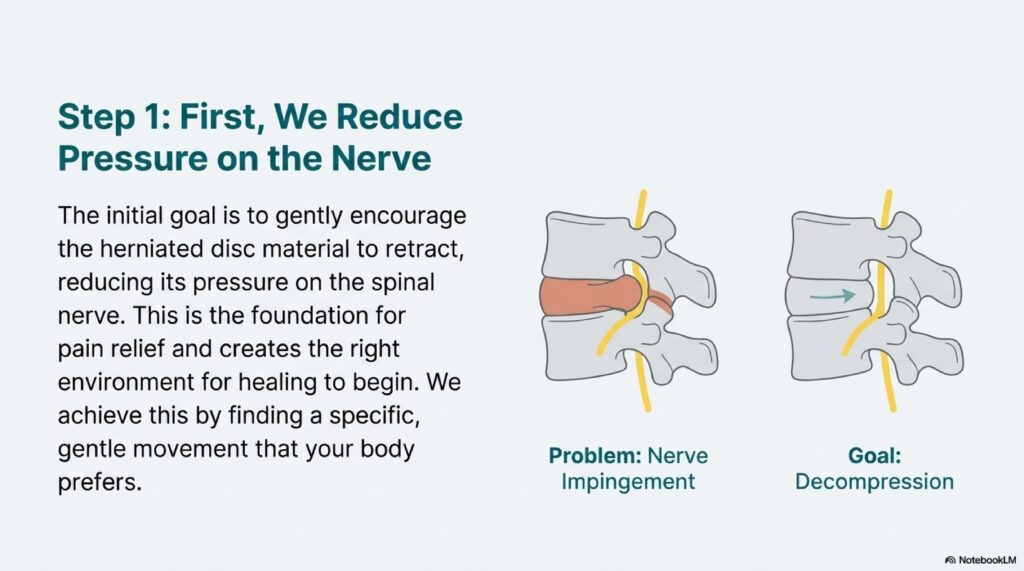
Step 1: Reduce Your Disc Extrusion (Stop the Pressure)
First things first – we need to get that disc material to stop pressing on your nerve. But we’re not just masking the pain here. We’re actually encouraging the herniation to reduce.
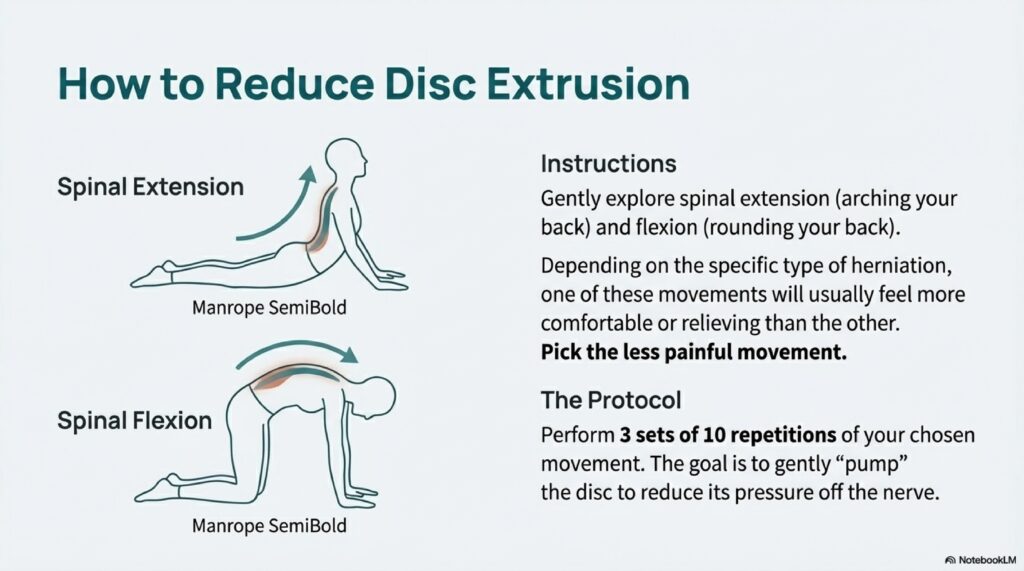
There are two main movements that can help push disc material back where it belongs: extension (arching backward) and flexion (curling forward).
Here’s the thing though – depending on where and how your disc herniated, one of these movements will feel better than the other. Some people get relief from arching back, others from curling forward.

How to Find Your Best Movement
Try both movements gently. Whichever one feels less painful and doesn’t shoot pain down your leg – that’s your winner. Don’t try to be tough and push through the more painful one. That’s your body telling you it’s the wrong direction.
Extension-Based Reduction
If backward bending feels better:
- Stand with your hands on your lower back
- Gently arch backward, looking up at the ceiling
- Hold for 2-3 seconds, then return to neutral
- Repeat 10 times
- Do 3 sets throughout the day
You can also do this lying face down, propping yourself up on your elbows or hands.
Flexion-Based Reduction
If curling forward feels better:
- Sit on a chair or stand
- Slowly curl your spine forward, bringing your chin to your chest
- Let your arms hang down
- Hold for 2-3 seconds, then return to neutral
- Repeat 10 times
- Do 3 sets throughout the day
Some people prefer doing this lying on their back, bringing their knees to their chest.
The goal here isn’t just pain relief. You’re using repeated movements to gradually coax that disc material back toward the center. Think of it like slowly working toothpaste back into the tube.
Do this consistently for at least 2-3 weeks before moving to step 2. I know that seems slow, but rushing this process is exactly why most people fail.
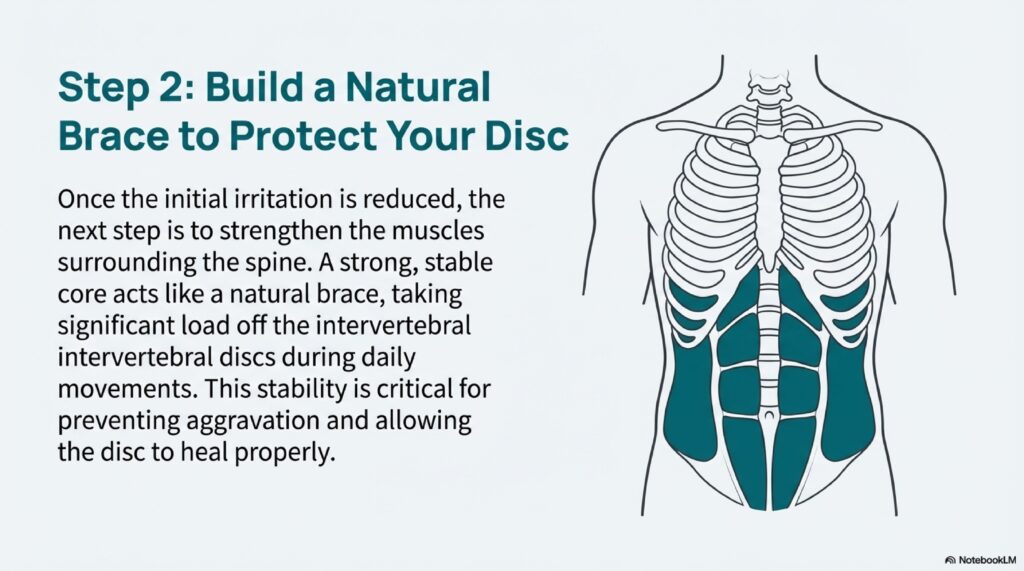
Step 2: Strengthen the Supporting Muscles (Build Your Natural Back Brace)
Okay, so you’ve reduced the disc pressure. Great. But if the muscles around your spine are weak, guess what? That disc is going to herniate again the next time you bend wrong or lift something heavy.
Your core muscles – and I’m talking about your deep core, not just your abs – act like a natural back brace. When they’re strong, they take load off your discs. When they’re weak, your discs absorb way more stress than they should.
This is where most people’s rehab programs fall apart. They skip the boring, uncomfortable strengthening work because it doesn’t feel like it’s “doing” anything.
Big mistake.
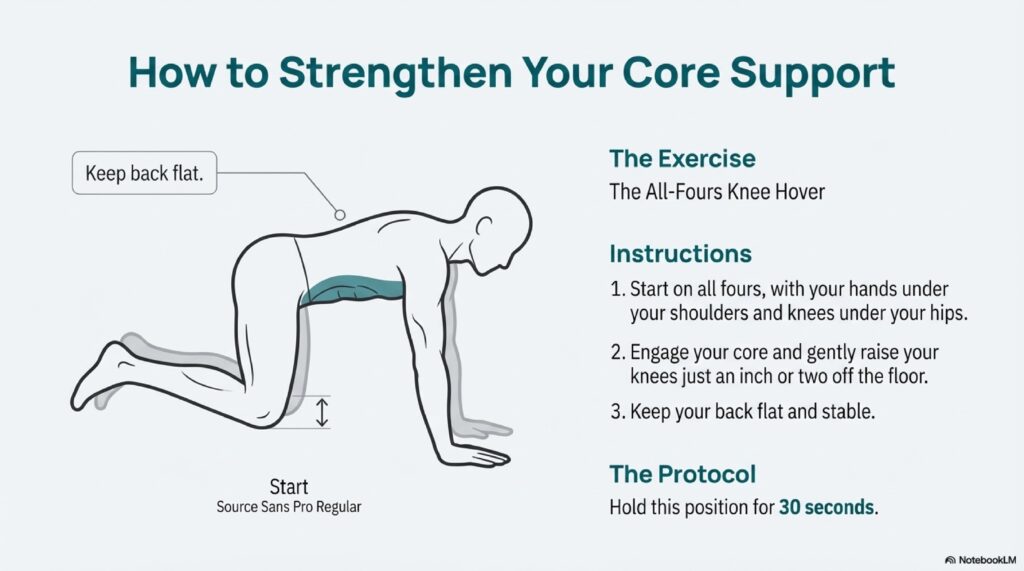
The Bear Hold (Your New Best Friend)
This exercise looks simple but don’t let that fool you. It’s one of the most effective ways to build deep core stability.
How to do it:
- Get on your hands and knees (quadruped position)
- Hands directly under shoulders, knees under hips
- Engage your core like you’re bracing for a punch
- Lift your knees about 2 inches off the ground
- Hold this position for 30 seconds
- Rest and repeat 3 times
Your knees should barely be off the ground. We’re not going for height here – we’re going for tension and control.
What you should feel: Your abs burning, your shoulders working, maybe even some shaking. That’s good. That means muscles that have been lazy are finally waking up.
What you shouldn’t feel: Sharp pain in your back or leg pain. If you feel either, lower your knees back down and try again with less height.
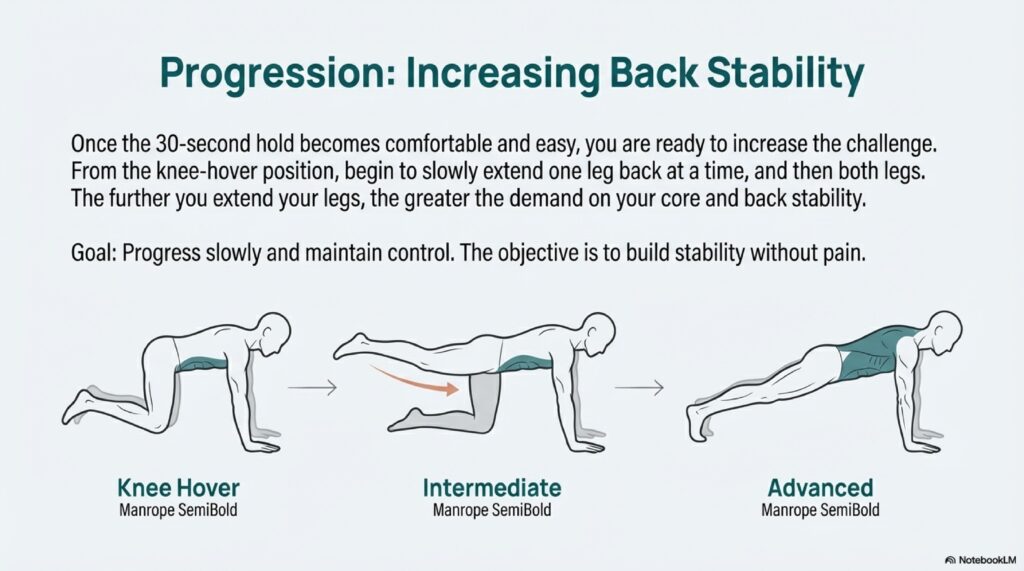
Progressing the Bear Hold
Once 30 seconds feels manageable (and trust me, it’ll take a few weeks), start making it harder:
Week 4-5: Hold for 45 seconds
Week 6-7: Hold for 60 seconds
Week 8+: Start extending one leg at a time while holding the position
When you extend a leg, your core has to work even harder to keep your spine stable. This is where the real magic happens. You’re teaching your body to protect your spine automatically, even during movement.
Do this exercise 4-5 times per week. It’s not sexy, it’s not fun, but it works.
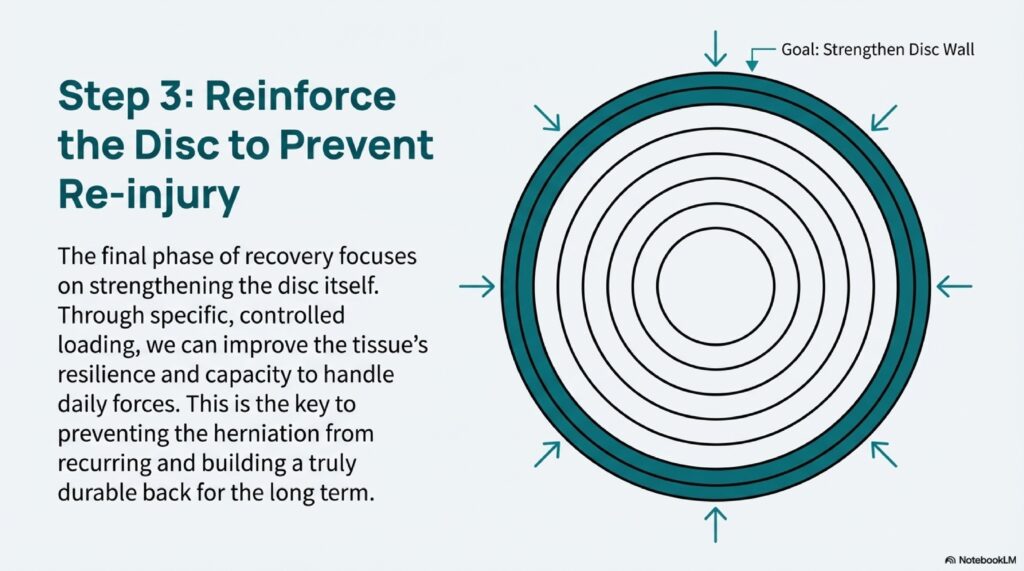
Step 3: Strengthen Your Disc Itself (Build Long-Term Resilience)
Here’s what most people don’t realize: your discs can actually get stronger. They’re not just fragile time bombs waiting to explode again.
When you stress your disc in the right way (gradually and progressively), it adapts. The outer layer gets tougher. The whole structure becomes more resilient.
The back extension is hands-down the best exercise for this. It loads your disc in a controlled way while building the muscles that protect it.
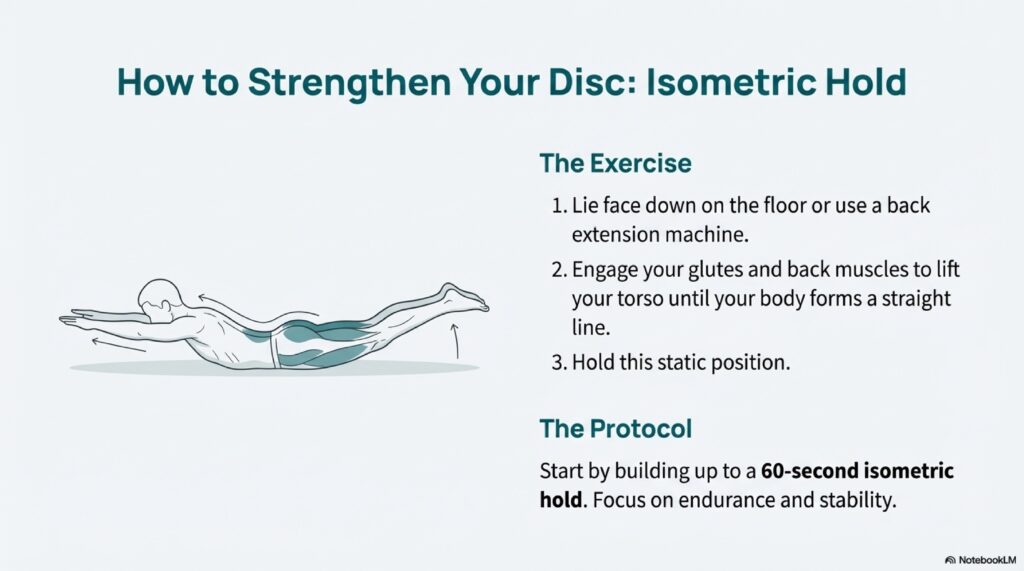
Starting Point: The Isometric Hold
Don’t jump straight into reps. We’re building tolerance first.
How to do it:
- Lie face down on the floor or on an exercise bench
- If on the floor: place your hands under your forehead
- If on a bench: let your upper body hang off the edge
- Lift your chest off the ground (floor) or raise your torso to parallel (bench)
- Hold this position
- Keep breathing – don’t hold your breath!
Start with whatever hold time you can manage comfortably. Maybe it’s 10 seconds. That’s fine. Do 3-4 holds, resting between each.
Your goal is to work up to a 60-second hold. Add 5-10 seconds each week.
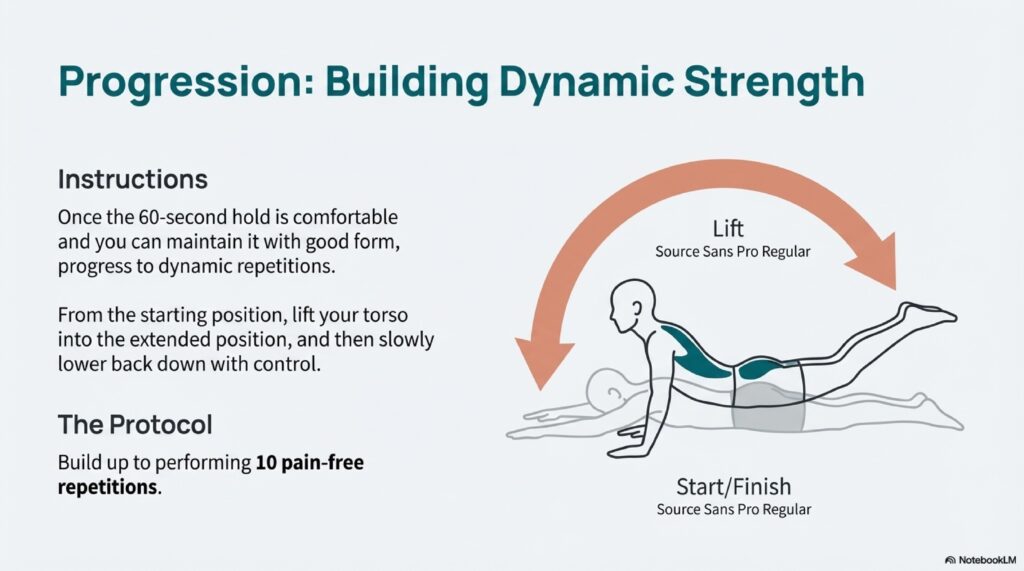
Progressing to Repetitions
Once you can hold for 60 seconds without pain, it’s time to start doing reps.
The rep protocol:
- Start in the same position as the hold
- Lower yourself down slowly (3-4 seconds)
- Raise back up in a controlled manner (2 seconds)
- That’s one rep
- Rest at the top if needed, but try to keep tension
Begin with just 5 reps. If those feel good and you have no pain the next day, add 1-2 reps the following week.
Your ultimate goal is 10 clean, pain-free reps. When you can do that, you know your disc has built some serious resilience.
Common Mistakes to Avoid
Going too high: You don’t need to arch way back. Just raise to parallel or slightly above.
Moving too fast: Control is everything. No jerking or momentum.
Skipping the hold phase: Don’t rush to reps. The isometric hold builds the foundation.
Pushing through pain: Some muscular fatigue is fine. Sharp pain or leg symptoms? Stop immediately.
Putting It All Together: Your Complete Recovery Timeline
Recovery isn’t linear, and everyone’s different. But here’s a realistic timeline based on what I’ve seen work for hundreds of people.
Weeks 1-3: Disc Reduction Phase
Focus: Step 1 only
What you’re doing:
- Extension or flexion exercises (whichever feels better)
- 3 sets of 10 reps daily
- Ice for 15 minutes after if there’s inflammation
- Gentle walking (10-15 minutes, 2-3 times daily)
What success looks like: Pain starts centralizing (moving from your leg toward your back), reduced leg symptoms, improved mobility.
Weeks 4-7: Muscle Strengthening Phase
Focus: Steps 1 and 2
What you’re doing:
- Continue your disc reduction exercises
- Add bear holds (30-60 seconds, 3 sets)
- Gradually increase walking (20-30 minutes daily)
- Start paying attention to posture and movement patterns
What success looks like: Back pain improving, able to do normal activities with less discomfort, building confidence.
Weeks 8-12: Disc Strengthening Phase
Focus: All three steps
What you’re doing:
- Reduce disc reduction exercises to maintenance (once daily)
- Continue bear holds, adding leg extensions
- Back extension isometric holds building to 60 seconds
- Begin adding other core exercises (planks, bird dogs)
What success looks like: Minimal to no pain, returning to activities you love, feeling stable and strong.
Weeks 13+: Maintenance and Prevention
Focus: Don’t get lazy now!
What you’re doing:
- Back extension reps (working toward 10)
- Core exercises 3-4 times weekly
- Staying active with walking, swimming, or other low-impact activities
- Continuing to use good lifting mechanics and posture
What success looks like: Living your normal life without constantly worrying about your back.
The Lifestyle Factors You Can’t Ignore
Exercises alone won’t cut it if you’re sabotaging yourself the other 23 hours of the day. Here’s what else matters:
Your Sitting Situation
Every minute you spend slouched at a desk is undoing your hard work. I’m not saying sitting is evil, but how you sit matters enormously.
Quick fixes:
- Set a timer for every 30 minutes – stand up and move
- Use a lumbar support cushion or rolled towel
- Keep your screen at eye level
- Feet flat on the floor, knees at 90 degrees
Better yet? Get a standing desk or convert your workspace so you can alternate between sitting and standing.
How You Sleep
Sleeping position can make or break your recovery. Stomach sleeping is the worst thing you can do for a herniated disc. Period.
Best positions:
On your side: Pillow between your knees to keep your spine aligned
On your back: Pillow under your knees to reduce disc pressure
Get a decent mattress. You spend a third of your life in bed. It’s worth the investment.
Your Weight
I’m not trying to be your mom here, but extra weight means extra load on your discs. Every pound of excess body weight puts about 4 pounds of extra pressure on your spine.
You don’t need to become a fitness model. Losing even 10-15 pounds can make a significant difference in how your back feels.
What You Eat
Inflammation makes everything worse. These foods fight inflammation:
- Fatty fish (salmon, mackerel, sardines)
- Leafy greens (spinach, kale)
- Berries (blueberries, strawberries)
- Nuts (especially walnuts)
- Turmeric and ginger
- Olive oil
These foods increase inflammation:
- Processed foods and fast food
- Excess sugar and refined carbs
- Trans fats
- Excessive alcohol
You don’t have to be perfect. Just tip the balance toward the good stuff more often than not.
What to Do When You Have a Flare-Up
Even with perfect rehab, you might have setbacks. That’s normal. Don’t panic.
Immediate response:
- Back off the exercises temporarily
- Return to your disc reduction movements more frequently
- Use ice for 15-20 minutes if there’s inflammation
- Avoid whatever triggered the flare-up
- Rest a bit more, but don’t go full bed rest
Recovery from flare-up:
Most flare-ups calm down within 3-5 days if you handle them right. Once symptoms settle, gradually reintroduce your strengthening exercises. Don’t rush back to where you were – scale back and rebuild.
Think of it like a video game. If you die, you don’t quit the game. You go back a level and try again with what you learned.
When You Actually Need Professional Help
I’m all for self-rehabilitation, but sometimes you need backup. See a doctor or physical therapist if:
- Your pain is getting worse despite doing everything right
- You develop new symptoms like foot drop or severe weakness
- You lose bladder or bowel control (get to an ER immediately)
- You have numbness in your groin or inner thighs
- Conservative treatment hasn’t helped after 3 months
Surgery should be a last resort, but it’s not the end of the world if you need it. About 95-97% of herniated discs don’t require surgery, but that other 3-5% do. There’s no shame in that.
The Hard Truth About Recovery
Recovery takes time. Probably more time than you want it to take. Most people see significant improvement in 6-8 weeks, but full recovery often takes 3-6 months.
I know that sucks to hear. We live in a world of instant gratification, and back pain doesn’t play by those rules.
But here’s the thing: would you rather spend 3-6 months doing the work and actually fix the problem? Or would you rather spend years bouncing from one temporary solution to another, never really getting better?
The choice is yours.
Your Action Plan Starting Today
Stop overthinking this. Here’s what you do right now:
Today:
- Try both extension and flexion movements
- Figure out which one feels better
- Do your first set of 10 reps
- Set a reminder to do two more sets later
This week:
- Do your disc reduction exercises every day
- Start paying attention to how you sit and stand
- Take a 10-minute walk daily
- Cut out one inflammatory food
This month:
- Stay consistent with disc reduction
- Add bear holds by week 3-4
- Increase your daily movement
- Track your progress (pain levels, activities you can do)
This quarter:
- Progress through all three steps
- Build up to 10 pain-free back extension reps
- Return to activities you’ve been avoiding
- Establish a maintenance routine
Don’t try to do everything perfectly. Just start, stay consistent, and adjust as you go.
Bottom Line
Recovering from a herniated disc isn’t complicated, but it does require commitment. You can’t half-ass this and expect full results.
The three-step process works:
- Reduce the disc extrusion
- Strengthen your supporting muscles
- Build disc resilience
Do these consistently, avoid the lifestyle saboteurs, and give it time.
Your disc can heal. Your back can get stronger. You can get back to living your life without constant pain and fear.
But only if you stop chasing quick fixes and commit to doing the real work.
Your back is worth it. You’re worth it.
Now get off your phone and go do your first set of exercises.
